Installing the Active Directory Connector
As
stated previously, because Exchange Server 5.5 was designed to run in
the non-directory Windows NT 4 environment, it has its own directory
and no way of communicating with Active Directory. To solve this
problem, Microsoft introduced the Active Directory Connector (ADC).
Three versions of the ADC exist: the Windows 2000 Server version, the
Exchange 2000 Server version, and the Exchange Server 2003 version. (In
this chapter, the focus is on the Exchange Server 2003 version of the
ADC.) The Windows 2000 Server version was limited in its functionality
in that it could only synchronize the Site Naming context. While the
ADC could synchronize account information between Exchange Server 5.5
and Active Directory, it could not synchronize the Configuration Naming
context. As a result, it could not be used if you installed Exchange
2000 Server into an Exchange Server 5.5 organization.
The
Exchange 2000 Server version of the ADC was more full-featured than the
Windows 2000 Server version and allowed full connectivity between
Active Directory and Exchange Server 5.5, but in the real world, it was
cumbersome to work with since everything had to be configured manually.
The Exchange Server 2003 version of the ADC improves on the Exchange
2000 Server version and offers a number of configuration wizards that
help an administrator to configure ADC properties. Even though the
wizards greatly simplify deployment of the ADC, it is still useful to
be able to configure connection agreements and other settings manually.
A
connection agreement defines one- or two-way communication between data
sources. In this chapter, the emphasis in on the connection of the
Exchange Server 5.5 directory with Active Directory. In this context, a
connection agreement describes how information, such as mailboxes in an
Exchange Server 5.5 organization, is replicated into Active Directory
user accounts and vice versa.
Planning for an ADC Deployment
The
ADC is implemented as a service in your Active Directory domain.
Placement of the ADC is an important consideration because it can be a
resource-intensive service. Generally, you will want to install the ADC
on a member server in the same site as the server running Exchange
Server 5.5. You don’t want the server running the ADC and the server
running Exchange Server 5.5 that is synchronizing with the ADC to be
separated by slow bandwidth, if at all possible. Slow bandwidth is
typically associated with wide area network (WAN) connections but can
be viewed as anything less than 10 mega bits per second (Mbps).
The
ADC uses an Active Directory global catalog server in a multidomain
environment, so when configuring connection agreements after the
installation, you should use an Active Directory domain controller that
is a global catalog, preferably, or otherwise is on the same subnet as
a global catalog.
There
can be only a single instance of the ADC service on a given server, but
you can install the ADC service on multiple servers in a domain if
necessary (such as for redundancy). If you have multiple domains, you
will need to install at least one instance of the ADC service in each
domain. However, you can install as many instances of the ADC
Management components as necessary to administer the organization.
ADC Installation
The
account you use to install the ADC must be a member of the Schema
Admins and the Enterprise Admins groups. In smaller Active Directory
structures, there usually isn’t a concern in using the domain
Administrator account, but in large enterprise environments, the
Administrator account in a given domain may not also be a member of the
Schema Admins or the Enterprise Admins groups. This is because only the
Administrator account in the forest root domain is a member of these
groups by default. If you have child domains or additional domain trees
in the forest, the Administrator account for those domains will not be
a member of these groups by default.
You
should run ForestPrep and DomainPrep prior to installing the ADC. The
ADC Setup Wizard does extend the schema if it detects that ForestPrep
has not been previously run, but you will run into problems later when
configuring connection agreements if you have not run DomainPrep
because the Setup Wizard creates two domain local groups: Exchange
Services and Exchange Administrators.
Subsequent
installations of the ADC in the same forest do not configure the Active
Directory schema or create domain objects, so when performing
subsequent installations, only Enterprise Admins membership is required
of the installation account.
You will install the ADC as part of the practice at the end of this lesson.
Using the ADC Tools
Once
you finish installing the ADC, you can configure it to synchronize
between Active Directory and the Exchange Server 5.5 directory. You do
this through the Active Directory Connector Services management
console, which is accessed through the Start menu, in the Microsoft
Exchange program menu. After starting the console, there are two
options: Active Directory Connector (servername)
and ADC Tools. The first option allows you to configure ADC connection
agreements and settings manually. The second option, ADC Tools,
provides configuration assistance through a series of wizards. Figure 1 shows the ADC Tools page.
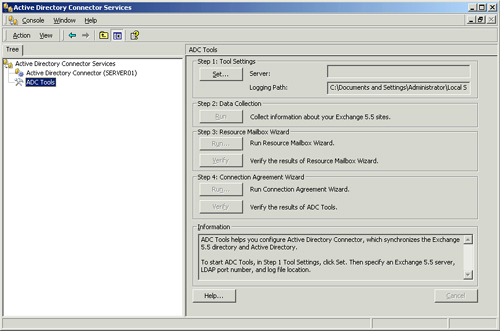
Using ADC Tools is a four-step process:
1. | Define
the settings that will be used throughout. This consists of setting the
Exchange Server 5.5 server and Lightweight Directory Access Protocol
(LDAP) port to be used, as well as a directory to write log files
created by ADC Tools to.
|
2. | In
the second step, you enter information about the Exchange Server 5.5
sites for use in later steps and identify user accounts that are
associated with multiple mailboxes in the Exchange Server 5.5
organization, as well as Exchange Server 5.5 objects that do not match
any objects in Active Directory and vice versa.
|
3. | Run
the Resource Mailbox Wizard. The wizard uses the data collected in Step
2 to allow you to manually resolve problems. For example, if you have a
user account in Active Directory that is associated with multiple
Exchange Server mailboxes, you can choose which mailbox will be the
primary mailbox for the account and which mailboxes will be resource
mailboxes. In Exchange Server 5.5, it was acceptable and common to have
multiple mailboxes associated with a single Windows NT user account
because there was no integration between the Windows NT accounts
database and the Exchange Server 5.5 directory. With Exchange 2000
Server and Exchange Server 2003, which are tightly integrated with
Active Directory, a one-to-one relationship between mailboxes and user
accounts is required. As a result, there can be only one mailbox, which
is defined as the primary mailbox here, associated with a user account,
Mailboxes set as resource mailboxes will have new disabled Active
Directory accounts created and associated with them.
|
4. | Run
the Connection Agreement Wizard, which is used to define connection
agreements between the Exchange Server 5.5 organization and Active
Directory. Connection agreements define whether changes made in the
Exchange Server 5.5 directory will be replicated (also called
synchronization) to Active Directory and vice versa. In addition, you
can control how much data is replicated in some cases. For example, you
might want to replicate only mailboxes and distribution lists from the
Exchange Server 5.5 directory, but not custom recipients. You can
choose what you want to replicate through the connection agreement.
|
After
finishing the configuration process with ADC Tools, you can test
directory synchronization by creating a new mailbox in Exchange
Administrator and choosing the option to Create A New Windows NT
Account. After you create the mailbox, you should see the new user
account in the Active Directory Users And Computers console.
Setting Up a Connection Agreement Manually
While
using ADC Tools is usually sufficient for configuring directory
synchronization, there are times when you will want to configure
connection agreements manually, especially in complex Exchange
environments involving multiple sites. The Active Directory Connector
Services console is used for configuring connection agreements manually.
The
environment into which you are deploying the ADC will dictate how you
set up your connection agreement. For example, if you need mailboxes to
be created automatically in Exchange Server 2003 for users created
using the Active Directory Users And Computers console, you will have
to replicate data from Windows to Exchange. Likewise, if you want the
Active Directory user account to be deleted automatically when the
associated mailbox is deleted, you must replicate data from Exchange to
Active Directory.
When
you begin to create a connection agreement manually, you should have a
design plan in mind regarding what the connection agreement intends to
accomplish and what servers will be involved. In a small organization,
you may have only a single Exchange Server 5.5 server and a couple of
domain controllers, which simplifies the configuration process.
However, in a large organization, you have to plan more carefully. For
example, when you create a new connection agreement, you must define a
server that will manage the connection agreement. This can be any
server in the organization that is running the ADC service. You must
also choose whether directory replication will occur in one direction
or whether there will be two-way replication back and forth between
Active Directory and the Exchange Server directory.
In
addition, you must also configure whether the connection agreement is
the primary connection agreement for both the Windows domain and the
Exchange organization. If this is the only connection agreement,
configuration is simple because it will, of course, be the primary
connection agreement for both. However, if you have multiple connection
agreements that are replicating account and mailbox data, it is
important that only one of them is configured as the primary connection
agreement. The reason for this is that the primary connection agreement
will take precedence when a conflict occurs in replication. If multiple
primary connection agreements exist, you could easily end up with
duplicate objects being created. The default configuration, on the
Advanced tab of the connection agreement’s properties, enables the
connection as a primary connection agreement for both the Windows
domain and the Exchange organization. You must clear the check boxes on
the Advanced tab if you do not want the connection agreement enabled as
the primary connection agreement.
Connection
agreements are not limited only to intra-organization. You have the
option to designate a connection agreement as an inter-organization
connection agreement, which replicates data between an Exchange Server
5.5 organization and an Active Directory domain that contains a
different organization. This is also configured on the Advanced tab of
the connection agreement.
Two-way
replication would be problematic if it simply began in both directions
at once. As a result, the connection agreement defines which direction
should begin replication. The default, set on the Advanced tab of the
connection agreement’s properties, is for replication to begin by
synchronizing data from Exchange to Active Directory. This behavior can
be changed by selecting From Windows from the drop-down list.
You
can also delete connection agreements using the Active Directory
Connector Services console. In fact, you must delete existing
connection agreements prior to uninstalling the ADC. Deleting a
connection agreement is a simple process. Right-click the connection
agreement that you want to delete, and then click Delete from the
context menu.
Replication
occurs regularly according to the schedule configured for the
connection agreement. However, there might be times when you want to
replicate changes immediately and do not want to wait for the scheduled
time or to reconfigure the schedule. You can initiate a manual
replication on a connection agreement at any time by right-clicking the
connection agreement in the Active Directory Connector Services
console, and then clicking Replicate Now.
Practice: Connecting Exchange Server 5.5 to Active Directory
In
this practice, you will create a number of Active Directory user
accounts and Exchange Server 5.5 mailboxes. Once you install the ADC
and use ADC Tools to configure directory synchronization, you will be
able to see the effects of your configuration on the accounts and
mailboxes by testing the configuration of your connection agreement.
This will ensure synchronization is taking place.
This
practice will use Server01 as outlined at the beginning of the chapter.
Create the following Active Directory user accounts, and then create
mailboxes in Exchange Server 5.5 and associate the mailboxes with the
user accounts:
Jenny Lysaker
Bob Gage
Nicole Holliday
Amy Alberts
Angela Barbariol
Eli Bowen
James Peters
Karen Berge
Jonathan Haas
Mark Hassall
Raymond Sam
Sean Purcell
In addition, create the following security groups in Active Directory (you do not need to add users to the groups):
MIS
Marketing
Sales
Executive
Finally,
create a mailbox named MIS in Exchange Server 5.5 and associate it with
Nicole Holliday’s user account. Create a mailbox named Executive and
associate it with Mark Hassall’s user account. Create mailboxes for
Marketing and Sales and associate them with their respective Active
Directory security groups. Create a user account for Nicole Carol, but
do not create a mailbox for it.
Exercise 1: Install the ADC
1. | Run ForestPrep and DomainPrep.
|
2. | The
ADC is located on the Exchange Server 2003 installation CD in a folder
named ADC. For the purposes of this chapter, install the ADC on the
Windows 2000 server running Exchange Server 5.5. From your CD-ROM
drive, start \ADC\I386\Setup.exe.
|
3. | The Active Directory Connector Setup Wizard starts. Click Next at the Welcome page.
|
4. | The
next page of the setup wizard is the EULA. Read through it, select the
I Accept The Terms Of The License Agreement option, and then click Next.
|
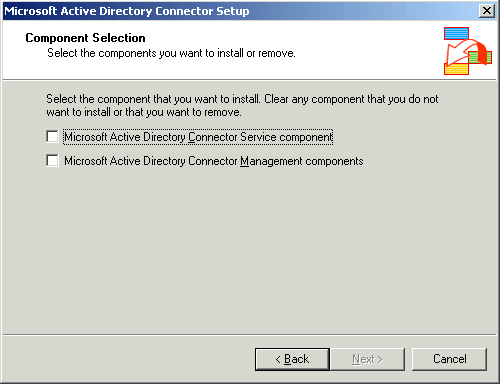
5. | On the Component Selection page, shown in Figure 2,
choose which components to install. The first option is Microsoft
Active Directory Connector Service Component, which is the actual
service. The second option is Microsoft Active Directory Connector
Management Components, which is the administrative tools used to manage
the ADC service. Select both options, and then click Next.
|
6. | The
next page of the wizard prompts you to choose an installation location.
You can accept the default location of \Program Files\MSADC or you can
choose a different location. After selecting an installation location,
click Next.
|
7. | Next,
you must supply a service account to be used by the ADC service. The
Account Name will default to the account you are currently logged in
with. If you created a service account for Exchange Server, use it
instead. Enter the password as required, and then click Next.
|
8. | Setup
copies the required files to your server and configures its service.
Click Finish when it is done. If a screen still appears prompting you
to click Next when the installation is done, do so, and then click
Finish.
|
Exercise 2: Prepare Exchange Server 5.5 for Directory Synchronization
1. | On Server01, from the Start menu, point to Programs, point to Microsoft Exchange, and click Exchange Administrator.
|
2. | Expand
the Site container, and then expand the Configuration container. Click
the Protocols container, and then double-click LDAP (Directory) Site
Defaults.
|
3. | Because
Server01 is an Active Directory domain controller, the default LDAP
port (389) is already in use and cannot be used by the ADC. You will
need to change the LDAP port to something else that is not in use, so
change the LDAP port number to 1389, and click OK.
|
4. | From
the Start menu, point to Programs, point to Administrative Tools, and
click Services. Restart the Microsoft Exchange System Attendant
service, and click Yes when prompted to restart all the services that
depend on it. Close Services when done.
|
Exercise 3: Verify Directory Synchronization
1. | Start Exchange Administrator if it is not open.
|
2. | Navigate to the Recipients container and click it.
|
3. | Click File, and then click New Mailbox.
|
4. | Create a mailbox for Chris Meyer, choosing to create a new Windows NT account.
|
5. | Create the user account as Chris, and click OK when Exchange prompts you that the account will be created with a blank password.
|
6. | Click OK to finish creating the mailbox.
|
7. | Open Active Directory Users And Computers and navigate to the Users container.
|
8. | Observe that there is a user account for Chris Meyer, which verifies that the connector works. Quit the program. |